构建适用于RK3399芯片的Armbian
本文最后更新于:2025年8月23日 下午
前言
偶尔在小黄鱼收到一块主板,版本号为:ZYSJ1739A2-V3.0,核心是瑞芯微RK3399,但是刷入ophub适配的zysj镜像之后,网口无法正常使用,通过查看设备树文件,发现适配的其实是zysj另一款同核心型号的主板:ZYSJ1739A-V1.3,以太网PHY芯片型号:RTL8211E(千兆);而我这块主板的以太网PHY芯片型号:RTL8201F(百兆),所以本文章将对原设备树进行小幅修改,使其网口能够正常工作,并自行构建对应的Armbian,仅供参考。
使用的项目主要是 ophub amlogic-s9xxx-armbian 以及 unifreq linux 等Github开源项目,配合Actions进行云上编译操作,可以方便快速构建适用于瑞芯微RK3399芯片的Kernel以及Armbian。
U-Boot
在构建amlogic-s9xxx-armbian时会自动下载ophub u-boot仓库的文件,无法修改成其他仓库。
Kernel
Github上有很多适用于瑞芯微芯片的kernel项目,以下只列出部分:rockchip-linux、radxa computer、unifreq、codesnas。
本文章使用的是unifreq/linux-6.12.y,先Fork该项目到自己的仓库(记得给unifreq大佬一个⭐️)。

修改设备树
对于不同核心架构的瑞芯微芯片而言,设备树路径会有所不同:
32位:arch/arm/boot/dts/rockchip
64位:arch/arm64/boot/dts/rockchipzysj的设备树路径为:
arch/arm64/boot/dts/rockchip/rk3399-zysj.dts修改
&gmac代码:1
2
3
4
5
6
7
8
9
10
11
12
13
14
15
16
17
18
19
20
21
22
23
24
25
26
27
28
29
30
31
32
33
34
35
36
37// ZYSJ1739A2-V3.0使用的是百兆以太网收发器(大部分源码来自原版ZYSJ1739A-V1.3,其中部分为DeepSeek生成)
&gmac {
// 新增以下复位配置
resets = <&cru SRST_A_GMAC>; // 根据SoC手册确定复位控制器名称
reset-names = "stmmaceth"; // 标准复位名称
snps,reset-active-low; // 复位信号低电平有效(根据硬件调整)
snps,reset-delays-us = <0 10000 50000>; // 复位时序:延迟、脉宽、释放后延迟
assigned-clock-rates = <50000000>; // RMII必须的50MHz时钟
assigned-clocks = <&cru SCLK_RMII_SRC>;
assigned-clock-parents = <&clkin_gmac>;
clock_in_out = "output";
phy-supply = <&vcc_phy>;
phy-mode = "rmii";
phy-handle = <&rtl8201f>;
pinctrl-names = "default";
pinctrl-0 = <&rgmii_pins>, <&phy_intb>, <&phy_rstb>;
tx_delay = <0x30>;
rx_delay = <0x20>;
status = "okay";
mdio {
compatible = "snps,dwmac-mdio";
#address-cells = <1>;
#size-cells = <0>;
rtl8201f: ethernet-phy@1 {
compatible = "ethernet-phy-id001c.c816"; // RTL8201F PHY ID
reg = <1>;
interrupt-parent = <&gpio3>;
interrupts = <RK_PB2 IRQ_TYPE_LEVEL_LOW>;
reset-assert-us = <10000>;
reset-deassert-us = <30000>;
reset-gpios = <&gpio3 RK_PB7 GPIO_ACTIVE_LOW>; // bsp
};
};
};适配驱动
暂未涉及…
Build Kernel
Fork ophub kernel 项目到自己的仓库(记得给opbub大佬一个⭐️)。
配置Actions脚本
路径:.github/workflows/compile-mainline-kernel-on-a-server.yml
新增kernel源码
Fork Kernel源码后的仓库用户名(账号用户名),在构建时会去对应仓库寻找源码进行构建。
1
2
3
4
5
6
7
8
9
kernel_source:
description: "Select the kernel source"
required: false
default: "dongxunz"
type: choice
options:
- unifreq
- codesnas
- dongxunz设置kernel版本
y代表通配符,也可以指定具体版本,我这里选择的6.12.39,与Fork Kernel版本要对应。1
2
3
4
5
6
7
8
9
10
11
12
13
14
15
16
17
18
19kernel_version:
description: "Select kernel version"
required: false
default: "6.12.39"
type: choice
options:
- 5.4.y
- 5.10.y
- 5.15.y
- 6.1.y
- 6.6.y
- 6.12.y
- 6.12.39
- 5.4.y_5.10.y
- 5.15.y_6.1.y
- 6.6.y_6.12.y
- 5.4.y_5.10.y_5.15.y
- 6.1.y_6.6.y_6.12.y
- all新增kernel签名
在登录Armbian时终端会打印 kernel_version - signature 信息。
1
2
3
4
5
6
7
8
9
kernel_sign:
description: "Set the kernel custom signature"
required: false
default: "-dongxunz"
type: choice
options:
- -ophub
- -dongxunz
- -yourname修改映射路径名称
在
- name: Create a mapped directory任务中,将以下两条代码其中的ophub改为你的用户名称,以下是我修改的示例:这一步不修改好像也可以~
1
2
ln -sf /builder/kernel /home/runner/work/_actions/dongxunz/amlogic-s9xxx-armbian/main/compile-kernel/kernel
ln -sf /builder/output /home/runner/work/_actions/dongxunz/amlogic-s9xxx-armbian/main/compile-kernel/output修改内核使用的配置
在
- name: Compile the kernel [ ${{ inputs.kernel_version }} ]任务中,将uses:中的ophub修改成你的用户名称,以下是我修改的示例:这一步不修改好像也可以~
1
uses: dongxunz/amlogic-s9xxx-armbian@main
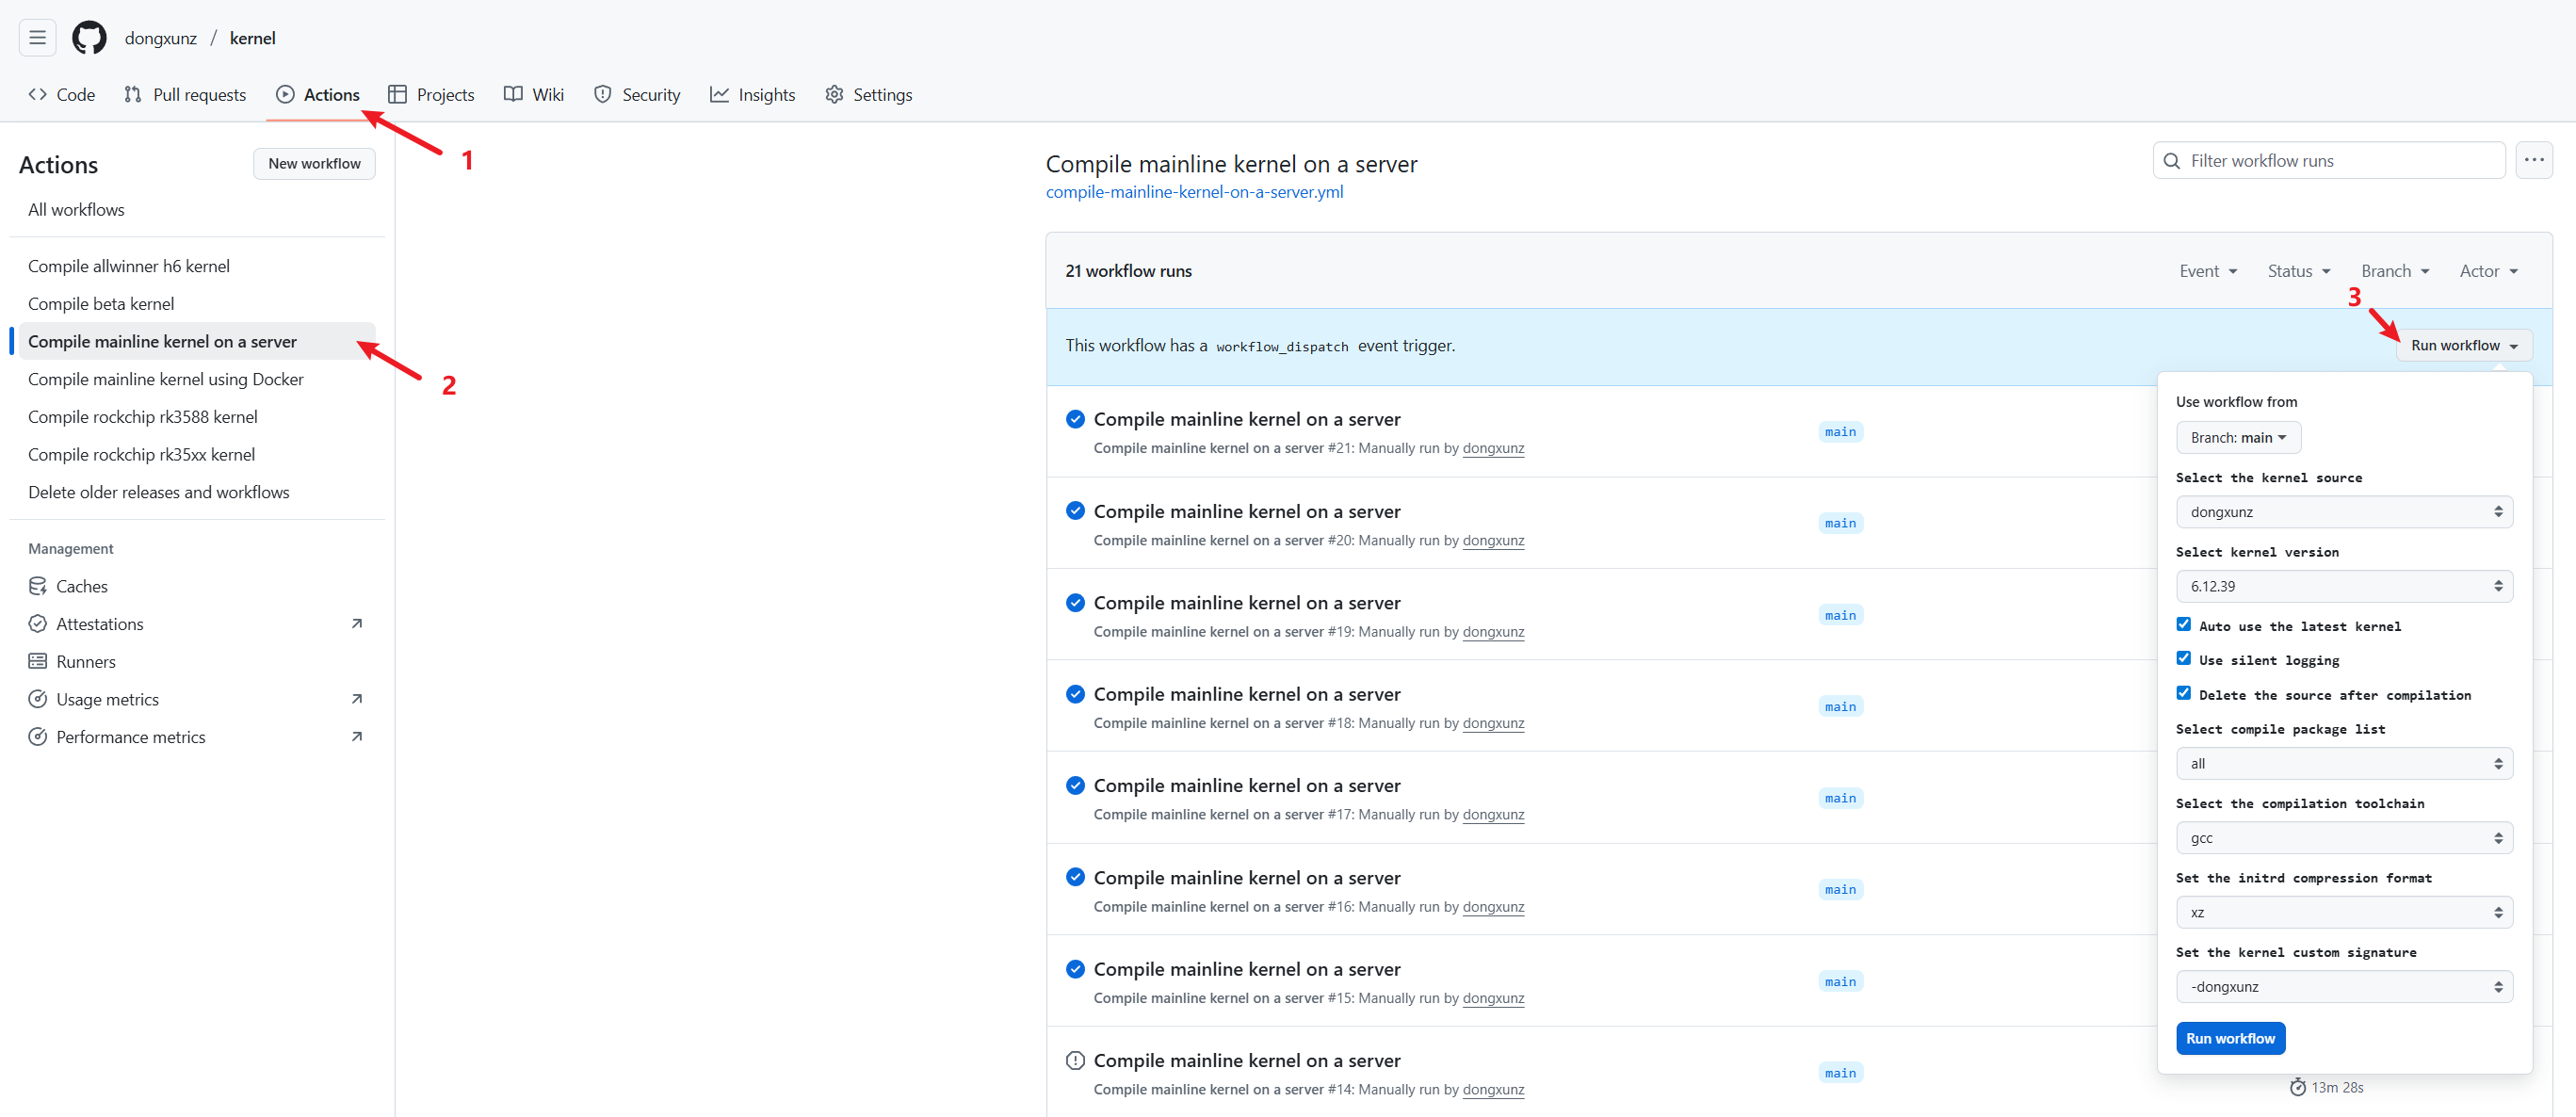
执行上述操作后,就可以开始使用Actions构建Kernel了,以下是操作示意图:
等待构建完成,会在该仓库的Releases中生成后续构建Armbian时所需的kernel_version.tar.gz文件。
Build Armbian
Fork ophub amlogic-s9xxx-armbian 项目到自己的仓库(记得给opbub大佬一个⭐️)。
修改Actions脚本
路径:.github/workflows/build-armbian-server-image.yml
配置Release版本
我选择的是
bookworm。1
2
3
4
5
6
7
8
9
10set_release:
description: "Select OS Release."
required: false
default: "bookworm"
type: choice
options:
- jammy
- noble
- bookworm
- bullseye修改主板型号
我选择的是
zysj。1
2
3
4
5
6
7
8armbian_board:
description: "Select device board."
required: false
default: "zysj"
type: choice
options:
- all
...配置kernel版本
与Build Kernel里的Release版本要对应,我选择的是
6.12.39。1
2
3
4
5
6
7
8
9
10
11
12
13
14
15
16
17
18
19armbian_kernel:
description: "Select kernel version."
required: false
default: "6.12.39"
type: choice
options:
- 5.4.y
- 5.10.y
- 5.15.y
- 6.1.y
- 6.1.147
- 6.6.y
- 6.12.y
- 6.12.39
- 5.4.y_5.10.y
- 5.15.y_6.1.y
- 6.1.y_6.12.y
- 6.1.y_6.6.y
- 6.6.y_6.12.y配置kernel源码仓库
Build Kernel源码仓库。
1
2
3
4
5
6
7
8kernel_repo:
description: "Set the kernel repository."
required: false
default: "dongxunz/kernel"
type: choice
options:
- ophub/kernel
- dongxunz/kernel新增Armbian签名
可以在系统里查询构建人签名信息。
1
2
3
4
5
6
7
8
9builder_name:
description: "Set Armbian builder signature."
required: false
default: "dongxunz"
type: choice
options:
- ophub
- angel
- dongxunz修改下载源码存放路径
在
- name: Download source code任务中,将以下两条代码其中的ophub改为你的用户名称,以下是我修改的示例:这一步不修改好像也可以~
1
ln -sf /builder/build /home/runner/work/_actions/dongxunz/amlogic-s9xxx-armbian/main/build修改重建时的配置
在
- name: Rebuild Armbian任务中,将uses:中的ophub修改成你的用户名称,以下是我修改的示例:1
uses: dongxunz/amlogic-s9xxx-armbian@main
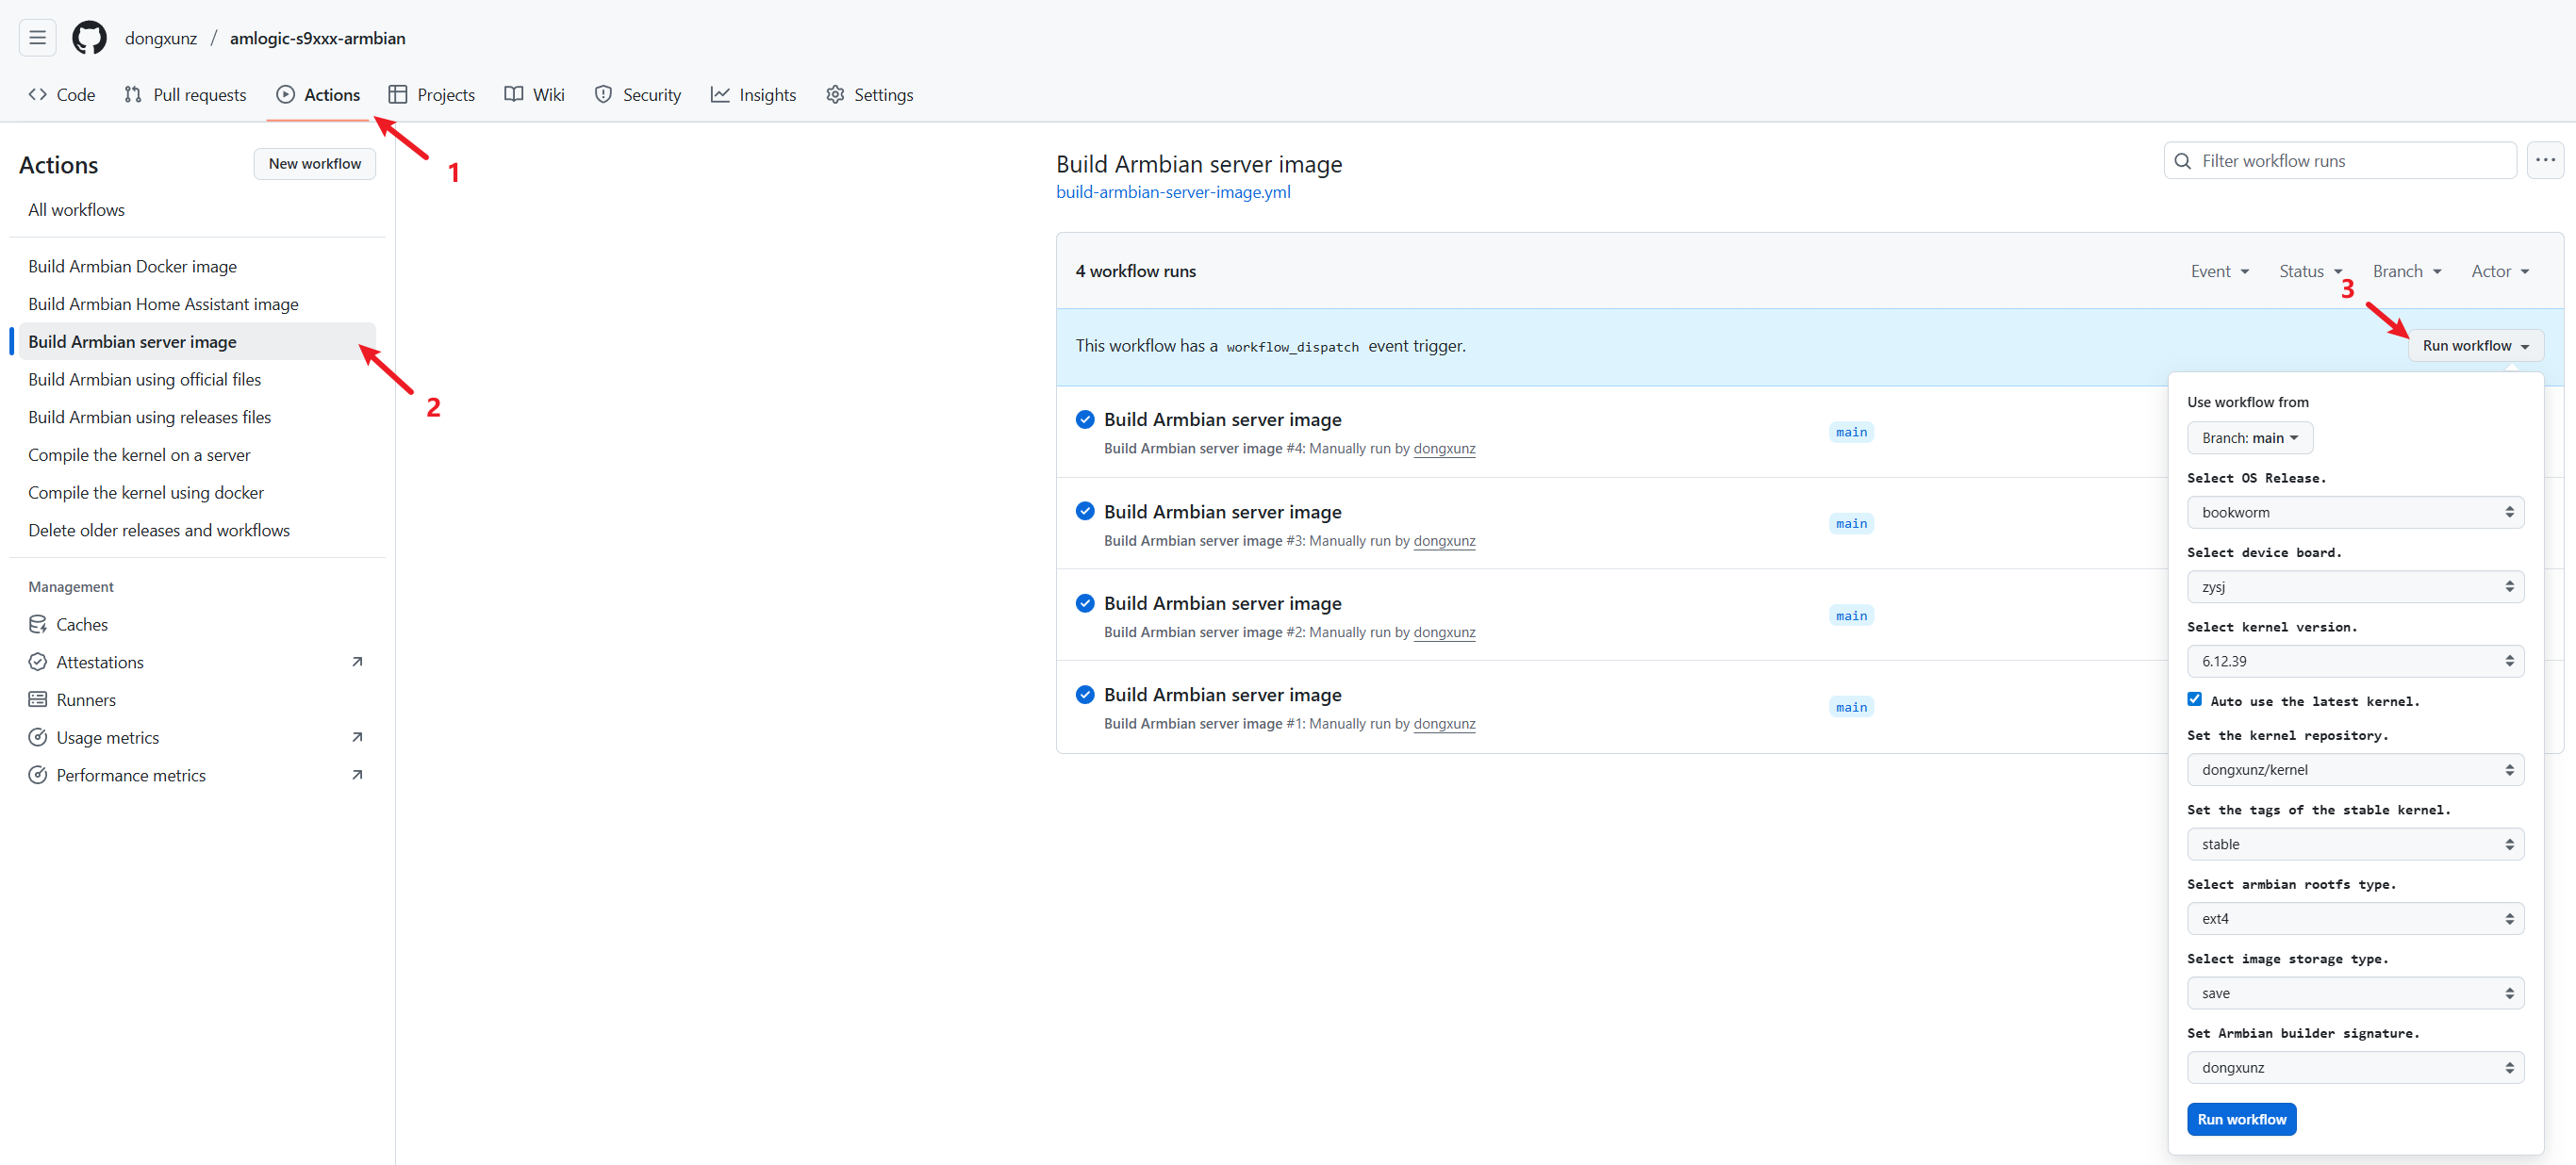
执行上述操作后,就可以开始使用Actions构建Armbian了,以下是操作示意图:
注意:其中的
Auto use the latest kernel.请慎重勾选。
等待构建完成,会在该仓库的Releases中生成对应主板的Armbian.img文件。
硬件修改
主板上有一个FE2.1 USB HUB芯片,但是其XRSTJ引脚其实是被某个GPIO控制的,默认上电是低电平,导致该芯片一直处于复位状态无法正常工作,目前暂未从原厂dtb中找到对应的引脚,索性将该引脚与GPIO相连的电阻直接去掉,再次上电即可正常工作。
烧录测试
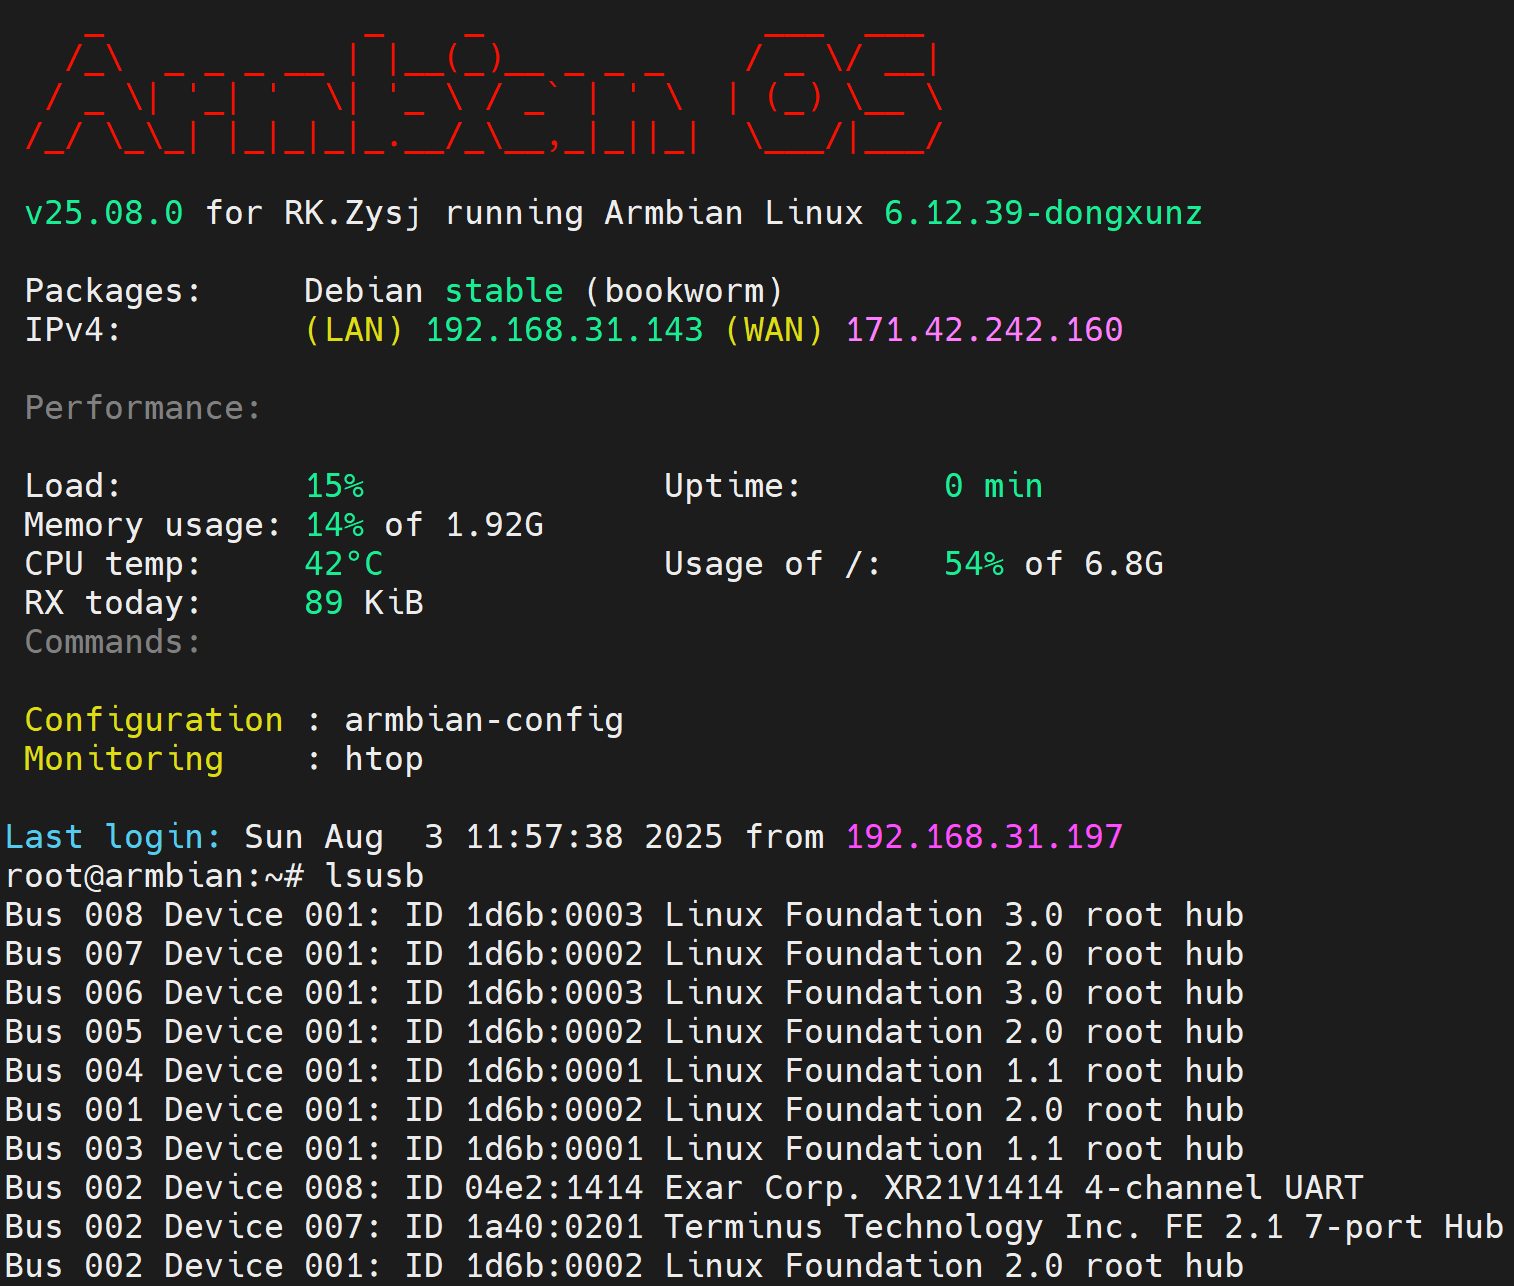
网络设备情况:
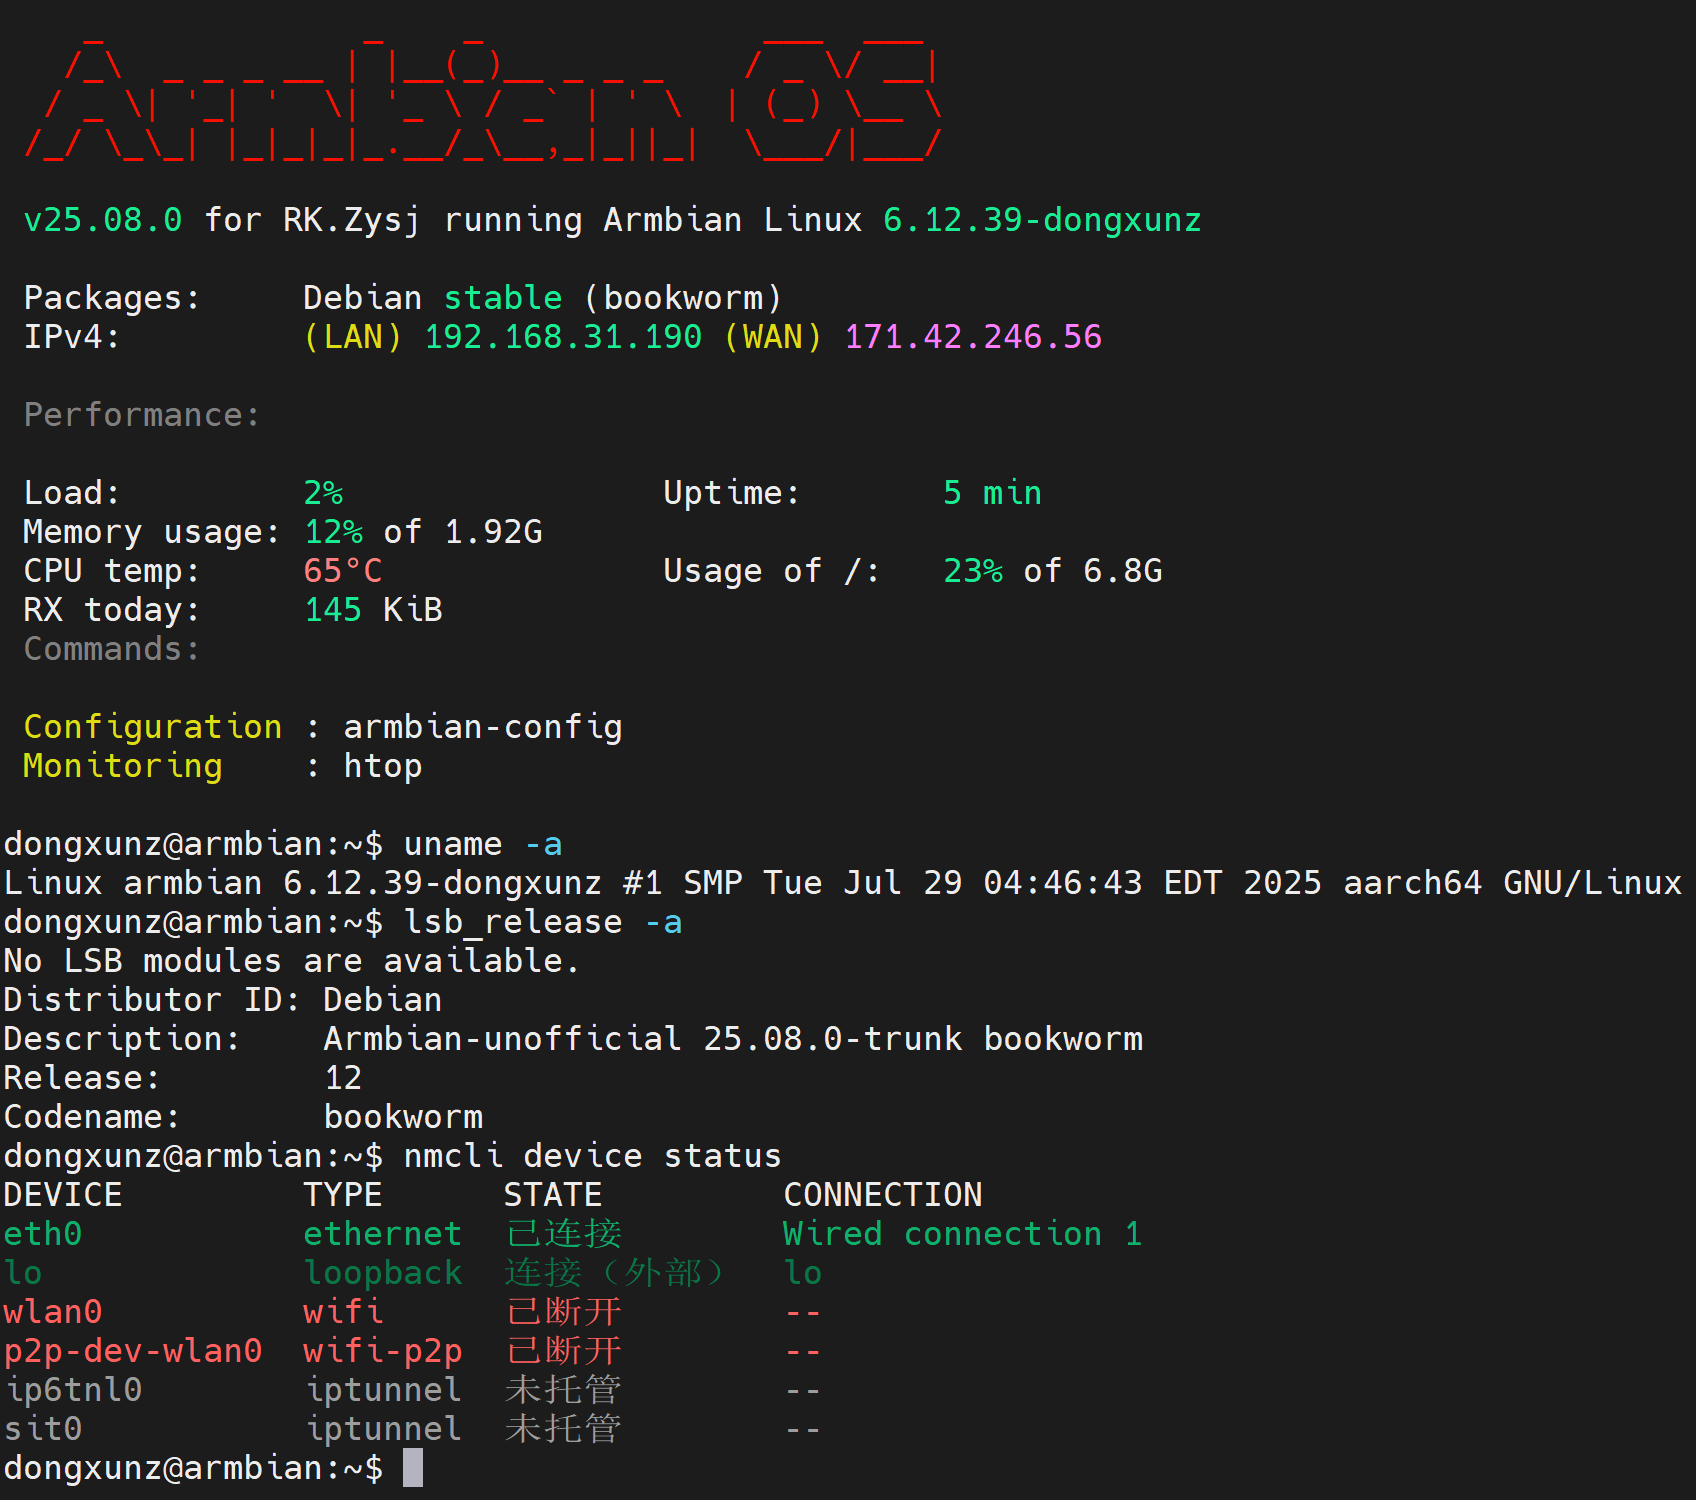
USB HUB情况: